Disciples of Caliban

Disciples of Caliban

Tuesday, November 26, 2013

The New Citadel Technical Paints


The New Citadel Technical Paints

Recently, Citadel released 6 new Technical paints.  They have various applications and uses individually and in conjunction with each other.  We are going to take a look at the 4 paints that I have picked up since their release.  We will talk about what each paint does and how to use it.  First, a brief overview of each paint.

Agrellan Earth - This is a medium brown crackle effect paint.  When applied thickly and let to dry, the paint will shrink and give a crackle effect.

Typhus Corrosion - This is a dark brown wash paint with small particles mixed in to give it some texture.  Can be thinned and applied like a normal wash.

Ryza Rust - This is a dry compound that is used to give a rust effect.  Used with Typhus Corrosion it gives very quick and nice rust looks.

Blood for the Blood God - This is a glossy dark red wash.  It is used to simulate the effect of wet blood.

Nurgle's Rot - This is a glossy green paint that can be quite transparent when applied, like a wash.  It gives the effect of wet, slimy, pestilence effect.

Nihilakh Oxide - This is a wash used to give the effect of weathered bronze and brass.

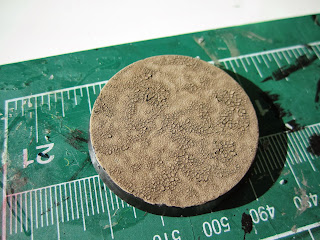
The first of these technical paints that I saw and wanted to try out was the Agrellan Earth.  This is so far my favorite paint out of the new technical paints, in fact I'm using it to base my Necrons instead of standard "sand and gravel" mixtures.  To use this paint, you're going to need to apply it much thicker than you normally would.  You may be thinking that this is a waste, but the thicker the paint the larger the cracks will be.  If you have a thin layer you will get fine hairline cracks that are barely noticeable, but can add a lot of detail to the base.  I recommend varying the thickness of the paint on the base as you apply it to have some high and low areas, this will give a more natural crackle effect when it dries.  It is recommended by Games Workshop that you let it dry for at least a hour, which is great if you have something else to work on or it's the last thing you're doing for the night.  I found that using a heat source like a hair dryer on "Low" gives it just enough heat to speed the drying process up to 1-2 minutes, and allows for the crackle effect to be seen as it dries!  Once the Agrellan Earth paint has cracked you will be able to see the color beneath it, so it is highly recommended that you paint your bases a darker color first!  I like the look of black or a dark brown under them as it gives good contrast.  To finish it off I added tufts from Games Workshop Midland Tufts which gave a good natural contrast and compliment to the crackle effect.  I have also had some success in using my airbrush over the crackle effect to give it a different color.  I tried to mix in the paint colors to Agrellan Earth and it thins out too much to achieve the crackle effect.  Using greys can get you a moonscape effect, and reds/oxides will get your a mars landscape effect.

Now, Agrellan Earth did have a bad batch run in the UK, so if you are not achieving the desired results, try a thicker layer of paint first.  If this still isn't working for you, check with your local GW store and see if they are doing a replacement offer for the paint.


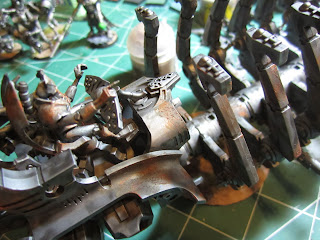
The next two paints work as a pair to give a great effect to vehicles and metal pieces.  Typhus Corrosion and Ryza Rust are the two you're looking for.  Typhus Corrosion is to be applied like you would a normal wash, allowing the grittiness of the paint to build up in areas where dirt and dust would normally collect over time.  As this is drying you can use a paper towel, cloth, or even your finger to blend the wash into the paint so you don't get the stark contrast that normally happens when you don't blend.  This paint actually dries very quickly for the consistency it has in the bottle, so you don't have to wait too long before you can go to the next part of the effect, Ryza Rust.  Ryza Rust is a bright orange dry compound that is used to simulate the effects of metal rusting.  Using a drybrush, get a little bit of the paint onto it and wipe it around on your towel to get most of it off.  There should be a very light layer of paint left on the brush.  Brush in the direction that water would flow on the model and rust would form, I usually do a downward direction.  This is a paint where less is more to get the effect.


The last one that I have gotten is Blood for the Blood God.  This is a wet looking blood effect paint that can be applied in two ways.  The first is by brushing it onto the areas in which you want to have a blood effect, such as Ork teeth or weapons.  For the use on weapons such as cleavers and swords, determine where the cut occurred and blood would start flowing from, this is where you're going to pull the paint away from so it looks like it streaked down/further onto the weapon.  Slowly build the paint up at the edge to give it a bit more gory look at the point of contact.  The second way to apply this paint is to get a splatter effect by "flicking" the paint onto the model.  To do this you will need a stippling brush.  This is a brush with very short stiff hairs.  Here's where it gets really messy.  You get some of the paint onto your stipple brush and hold it like you're giving a thumbs up to someone.  Using your thumb pull back on the bristles and let them flick the paint onto your desired location.  This will end up with paint going everywhere, so make sure you do it in a location that won't result in you getting into trouble.


Each of these paints will take some experimentation to get the effect that you desire out of them, but with practice and patience you will have great results for very little work.  I highly recommend that you pick them up if you are looking for a quick way to achieve any of these effects.  I will be continuing to experiment with them and enjoy their abilities.
Friday, October 25, 2013

Ravenwing Command Squad and Darkshroud


                I've been playing for just over a year after the Dark Vengeance box set was release with the onset of 6th Edition.  Before picking it up I looked into the fluff of the different armies and really liked the secretive nature of the Dark Angels, so the box set was well worth the price.  Since then my army has expanded exponentially to include over 50 terminators, 30+ bikes, and at least 4 squads of marines.  There is also a slew of support, vehicles, and other fun units to be thrown into the mix.

                I've been running a Ravenwing army on and off for a few months now and have been really enjoying how they play, even if I don't have a high win percentage with them.  They have a good intimidation factor with the number of T5 models on the field, at the cost of model count though.  Their ability to move quickly and hit hard is a huge appeal to me.  They can shoot and assault with reckless abandon them run out of combat giggling as their opponent wonders what just hit them.  In recent games I've really been focusing on using a Ravenwing Command Squad with Banner of Devastation.  I have also started to implement a Ravenwing Darkshroud into my list.  The way these two units work with the rest of a Ravenwing force is great and will be expanded upon further.  I don't profess myself as a tactical genius so I tend to make silly mistakes quite frequently, but I tend to have fun in the process, which is what I enjoy about the game.  Without further ado, I shall delve into my thoughts of these two units.

                Let's start with the Ravenwing Command Squad.  It is a squad of 3 Ravenwing  Black Knights that can only be unlocked by taking a HQ unit on a bike or Sammael.  To run a Ravenwing force, Sammael  is truly your only option, but I digress.  Black Knights come with TL Plasma Talons on their bikes which really outperform plasma guns at shorter range due to the TL aspect of them.  To get the same effect you would need a level 1 Librarian on a bike with Divination and have to get the psychic test to pass.  It's doable, but you still won't get the same volume of fire as you would with the Black Knights.  The Command Squad has the ability to add two more bike to the unit to bring them up to five total, which really helps increase the survivability of one key member in the squad, the banner carrier.  The banner carrier is the soul of my army and what it's built around.  It forces me to stay within a small area but it adds so much additional support with the Banner of Devastation.  If a unit is within six inches of the banner carrier it gains the Salvo 2/4 rule.  This is amazing on bikes as they are relentless and not counting as moved for shooting means that each bike in the unit will get 4 shots from its twin-linked boltgun.  For a full squad, that's 24 shots, four times the amount of a standard squad between 12 and 24 inches, and twice as many shots as a unit between 1 and 12 inches.  It's very important to keep this unit alive so I'm going to start trying out keeping an apothecary in the unit for the Fell No Pain he would give them in case of a wound.

                Last game I added in a model that I was very apprehensive about since they FAQ'd the rules on it very quickly, the Ravenwing Darkshroud.    It does exactly what it sounds like, it shrouds the area in darkness giving any unit within 6" of it the Stealth rule.  Unfortunately it no longer gives the Darkshroud itself Shrouded.  The great part of this is that the cover save stacks onto the Jink save that the bikes get for moving, effectively giving them a 4+ cover save just for moving and staying close to the Darkshroud.  For units with the Skilled Rider rule, this gives them a 3+ cover save!  I kept this centered behind my Command Squad and gave every unit in my army a +1 to their cover save for nearly the entire game.  This was very beneficial as my opponent had quite a bit of plasma and melta which was ignoring my armor saves.  In addition to this effect it gives any unit that is in an assault within 12 inches a +1 to their assault result.  This manage to keep one of my units in assault even those they lost a model and my opponent didn't that phase.  I was very surprised at how well that ability performed with the rest of my units.  I realize that it won't be beneficial against flamers and other weapons that ignore cover, looking at you Tau and Eldar, but I have other units in my arsenal that can put the pain into them instead.

                I feel like I will continue to use the two units in my Ravenwing army and possibly expand to a second Darkshroud in the future for large point games so I can spread them out more effectively to maximize coverage.  They Command Squad will be beefed out to the full 5 man unit and keep that wonderful Banner of Devastation.  I'm going to try to keep track of how the army performs and try to develop my tactical skills to help them really be the fearsome force that they appear when on the table.

Saturday, October 5, 2013

Brother Nemiel

Brother Nemiel, Dreadnought of the Disciples of Caliban, stands ready to fight for the chapter again.  Carrying a set of hurricane bolters and a power fist, he poses as a formidable opponent for troops and vehicles alike.


My plans for this model are to create a twin-linked heavy flamer for his right arm and change to a dreadnought close combat weapon with heavy flamer for the right.  He will drop in from the skies via drop pod and lay waste to hordes of enemies. 

He was painted with a grey base coat with directional highlighting from the top in white and shadows from below in black.  From there he received his green base coat and details in various colors.  Finishing up him was the edge highlights for the green and black using coal black.  Finishing him up was the basing in concrete and details.

Next up on the painting table is Interrogator-Chaplain Uzziel.  He will feature a walk through to painting.

Sunday, September 15, 2013

The Disciples increase

Have two more terminators ready to join the fight.


Dreadnought is also closing in on combat readiness.

Monday, August 12, 2013

Recently I was having troubles deciding how to paint my Deathwing Terminators for my Dark Angels army.  The standard Deathwing scheme, which is a bleached bone look, is difficult to achieve and takes many layers of multiple colors for just the armor.  It was a pain and I was never happy with the results.  I decided to look into some different scheme of Dark Angels and their successor chapters to find one that I liked.  I knew I wanted black in the armor, to go along with my Ravenwing units.  That helped lead me to the Disciples of Caliban.  With a mix of black, green and bone, I found that they mixed all three colors of the standard Dark Angels army into one color scheme that really popped.

I decided on this scheme on Friday and have since gotten three terminators nearly completed along with three tactical marines.  This is incredibly fast for me to paint, with each model taking about 2.5 hours.